
Homemade Garam Masala Recipe Secret to Aromatic Curries
If you have ever wondered why your homemade curries taste slightly flat compared to the rich, deeply fragrant dishes served at your favorite Indian restaurant, the answer rarely lies in complicated cooking techniques or secret ingredients. More often than not, the difference comes down to a single, foundational step that happens before the onions even hit the oil: toasting and grinding your own whole spices.
Pre-ground supermarket spice blends sit on warehouse shelves, in shipping containers, and on grocery store aisles for months—sometimes years—before they ever reach your kitchen cabinet. By the time you twist off the cap, the delicate essential oils that give spices their warmth, sweetness, and floral complexity have largely evaporated. What remains is dusty, muted, and one-dimensional. Homemade Garam Masala Recipe Secret to Aromatic Curries
Making an authentic homemade garam masala recipe takes less than ten minutes, requires zero culinary training, and instantly transforms every curry, dal, marinade, and roasted vegetable dish you cook. At Husband Can Cook, we believe that mastering a few high-impact fundamentals turns everyday home cooks into kitchen legends. Below, you can watch our quick 16-second visual walkthrough, followed by the complete step-by-step recipe, the food science behind dry roasting spices, storage rules, and chef troubleshooting tips.
Watch: How to Toast & Grind Fresh Garam Masala in 16 Seconds Homemade Garam Masala Recipe Secret to Aromatic Curries
See the exact process in action on the HusbandCanCook YouTube channel
https://youtube.com/shorts/wBNBndl6AtY
Quick Video Highlights:
[00:00] Start with large, dense aromatics—cinnamon stick, star anise, and green cardamom pods—in a dry, heavy-bottomed skillet.
[00:02] Layer in coriander seeds, cumin seeds, whole black peppercorns, cloves, and dried bay leaves, stirring continuously over gentle heat until fragrant.
[00:08] Transfer the cooled, toasted whole spices into a dedicated spice grinder and pulse into a fine, velvety powder.
[00:12] Spoon your freshly ground garam masala straight into an airtight glass jar to lock in the essential oils.
What Is Garam Masala? (And Why It’s Not “Curry Powder”) Homemade Garam Masala Recipe Secret to Aromatic Curries
In Hindi, garam translates to “hot” or “warming,” and masala simply means “mixture of spices.” Contrary to popular belief outside South Asia, garam does not refer to fiery chili heat. Traditional garam masala rarely contains cayenne or red chili powder at all. Instead, it refers to spices that are believed in Ayurvedic culinary tradition to warm the body, stimulate digestion, and create a comforting, lingering depth on the palate.
Many home cooks confuse garam masala with generic yellow curry powder, yet they serve completely different roles in the kitchen:
Because garam masala is added toward the finish of a dish—right before you turn off the heat on a simmered butter chicken, chana masala, or creamy lentil dal—its volatile aromatic compounds hit your nose the moment the plate lands on the table. That signature aroma is impossible to fake with stale, pre-ground powder.
The Science of Dry Roasting Spices: Why Toasting Matters
When you heat whole spices in a dry skillet without oil or water, two distinct chemical transformations happen simultaneously:
Volatile Essential Oil Activation: Whole seeds, bark, and dried pods are nature’s miniature flavor vaults. Inside a coriander seed or green cardamom pod, aromatic compounds like linalool, cineole, cuminaldehyde, and eugenol are trapped within fibrous plant walls. Gentle dry heat causes the tiny pockets of moisture and oil inside the spice to expand, fracturing the cellular structure and bringing those essential oils to the surface.
The Maillard Reaction & Pyrazines: As the exterior of the spices reaches roughly 140°C to 165°C (285°F to 330°F), natural sugars and amino acids undergo gentle browning. This creates brand-new nutty, roasted, and complex flavor compounds (called pyrazines) that simply do not exist in raw spices.
However, timing and temperature are everything. Essential oils are called volatile for a reason—if the pan gets too hot, those precious oils vaporize into smoke, leaving behind acrid, charred carbon. The goal is never to fry or scorch the spices; it is to gently wake them up.
Essential Ingredients in Our Homemade Garam Masala Blend
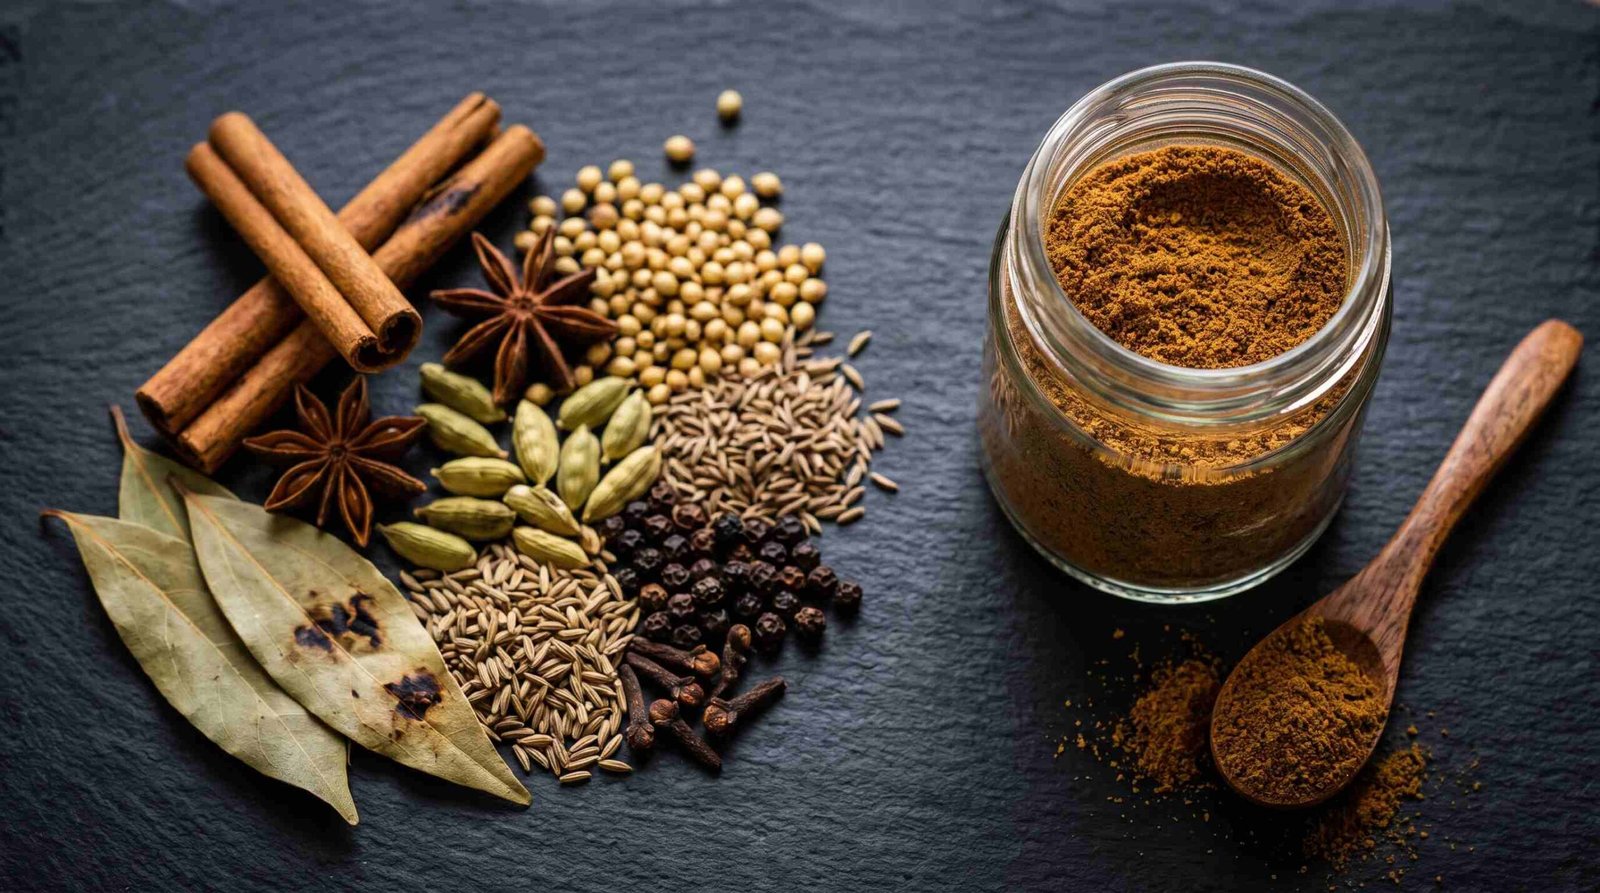
While every region and household across India guards its own signature ratio, the eight whole spices featured in our video create a balanced, versatile, all-purpose garam masala suitable for meat curries, vegetarian stews, biryanis, and roasted vegetables:
Coriander Seeds (Dhaniya): The structural backbone of the blend. Coriander brings a bright, citrusy, slightly nutty sweetness that rounds out heavier spices without overpowering them.
Cumin Seeds (Jeera): Provides warm, earthy, savory depth. Cumin transforms dramatically when toasted, shifting from sharp and grassy to rich and nutty.
Green Cardamom Pods (Choti Elaichi): The jewel of Indian aromatics. Green cardamom delivers a sweet, floral, eucalyptus-like lift that makes curries smell unmistakably restaurant-grade. (Tip: Grind the whole green pods—both the papery husks and the tiny black seeds inside carry intense fragrance.)
Cinnamon Stick (Dalchini): Adds woody warmth and natural sweetness. If you can find Ceylon cinnamon (“true cinnamon”), use it—it is papery, delicate, and easier on grinder blades than thick, hard Cassia bark. Break the stick into smaller shards before toasting so it heats evenly.
Star Anise (Chakri Phool): Contributes a subtle, sophisticated licorice-like sweetness that pairs remarkably well with slow-cooked tomatoes, onions, and rich gravies. Because star anise is potent, one or two whole stars per batch is plenty.
Whole Cloves (Laung): Intense, sweet, and slightly peppery. Cloves pack tremendous punch, so measure carefully—too many cloves can numb the palate and dominate the entire blend.
Black Peppercorns (Kali Mirch): Delivers sharp, clean warmth and gentle back-of-the-throat heat without altering the color of your dish.
Dried Bay Leaves (Tej Patta): Adds an herbal, tea-like undertone that ties the heavier bark and seed spices together. Tear the dried leaves into smaller pieces before toasting so they crisp up uniformly.
(Optional Regional Variations: Once you master this base blend, you can customize future batches by adding 1 blade of mace [javitri], a pinch of freshly grated nutmeg [jaiphal], 1 black cardamom pod [badi elaichi] for smoky depth, or 1 teaspoon of fennel seeds [saunf] for extra sweetness.)
Authentic Homemade Garam Masala Recipe (Step-by-Step)
Prep Time: 3 minutes | Toast Time: 4 minutes | Cool & Grind Time: 8 minutes
Total Time: 15 minutes | Yield: Approximately ½ cup (60g)
Ingredients
3 tablespoons whole coriander seeds
2 tablespoons whole cumin seeds
1 tablespoon whole black peppercorns
10–12 whole green cardamom pods
1 (3-inch) cinnamon stick, broken into small pieces
2 whole star anise pods
6–8 whole cloves
2 medium dried bay leaves, torn into pieces
Recommended Equipment
A heavy-bottomed skillet (cast iron or tri-ply stainless steel distributes heat evenly and prevents hot spots)
A wooden spoon or heatproof spatula
A wide, room-temperature plate or baking sheet for cooling
An electric spice grinder (or clean dedicated coffee grinder) or a heavy granite mortar and pestle
A clean, dry airtight glass spice jar
Instructions
Step 1: Preheat a Dry Skillet Over Low-Medium Heat
Place your heavy-bottomed frying pan over low to medium-low heat for about 60 seconds. Do not add any oil, ghee, or water. You want the pan warm enough to coax out essential oils, never smoking hot.
Step 2: Toast the Dense Aromatics First
Add the broken cinnamon stick pieces, star anise, green cardamom pods, and cloves to the dry pan. Because dense bark and pods take slightly longer to warm through than small seeds, giving them a 45-to-60-second head start ensures every spice finishes at the exact same moment without scorching. Stir gently with a wooden spoon.
Step 3: Add the Seeds, Peppercorns, and Bay Leaves
Pour in the coriander seeds, cumin seeds, black peppercorns, and torn bay leaves. Spread the spices out into a single even layer across the base of the pan so they make direct contact with the warm surface.
Step 4: Stir Constantly Until Fragrant (3 to 4 Minutes)
Keep the spices moving continuously by shaking the pan or stirring with your wooden spoon. Rely on your senses rather than a strict timer:
Sight: The coriander and cumin seeds will deepen by one or two shades to a rich golden-brown.
Sound: You may hear faint, gentle popping or crackling as moisture escapes the seeds.
Smell: The kitchen will suddenly fill with a warm, sweet, toasted aroma.
Step 5: Transfer Immediately to a Cool Plate
The exact second the spices smell intensely fragrant and turn a shade darker, remove the pan from the burner and immediately pour the spices onto a cool, dry plate. Never leave toasted spices sitting in the hot skillet—residual heat from cast iron or stainless steel will continue cooking them and can burn the cumin in under 15 seconds.
Step 6: Cool Completely Before Grinding
Let the toasted spices rest on the plate for 5 to 7 minutes until they reach room temperature. Warm spices release steam inside a closed grinder, which turns the powder clumpy, dulls the flavor, and causes the oils to stick to the blades. Cooling also makes the spices crisp and brittle, allowing them to shatter effortlessly into a fine dust.
Step 7: Grind Into a Fine, Silky Powder
Transfer the cooled spices into your spice grinder. Pulse in short 10-to-15-second bursts, shaking the grinder gently between pulses so the bottom blades don’t overheat the powder. Continue until you achieve a uniform, fine, velvety texture. (Optional: If you want ultra-silky restaurant texture, pass the powder through a fine-mesh sieve and re-grind any remaining coarse cardamom husks.)
Step 8: Store in an Airtight Glass Jar
Spoon your fresh garam masala into a clean, completely dry glass jar and seal the lid tightly. Label the jar with the date so you can track peak freshness.
7 Common Mistakes That Ruin Homemade Spice Blends
Even simple recipes have pitfalls. Avoid these seven mistakes to guarantee maximum aroma every time:
Using High Heat to Save Time: Cranking the burner to high creates a razor-thin margin between “toasted” and “ruined”. If you see wisps of gray smoke or smell anything sharp or acrid, toss the batch and start over—burnt cumin and cloves will make an entire pot of curry taste bitter.
Overcrowding the Pan: Piling spices two inches deep traps steam on the bottom and leaves the top layer raw. Use a wide skillet so the spices sit in a thin, even layer.
Grinding Spices While Still Hot: Friction from high-speed grinder blades generates heat on its own. Starting with hot spices double-cooks the essential oils and creates clumps from trapped condensation. Always cool completely first.
Using a Coffee Grinder Without Cleaning It First: Nobody wants dark-roast espresso notes in their butter chicken—or cardamom in their morning drip coffee. Dedicate a separate $20 blade grinder strictly to spices, or clean your grinder thoroughly by pulsing uncooked white rice and wiping it out with a dry cloth.
Storing Garam Masala Above the Stove: Heat, humidity, and direct sunlight are the three biggest enemies of ground spices. Keep your glass jar in a cool, dark pantry drawer rather than on an open spice rack right next to the cooktop.
Making Huge Bulk Batches: Whole spices stay potent for 1 to 2 years, whereas freshly ground spices begin losing peak vibrancy after 3 to 4 months. Make small ½-cup batches every couple of months so your masala is always electric.
Adding Garam Masala Too Early in the Recipe: Unlike whole cumin seeds or turmeric that need to bloom in hot oil at the start of a dish, garam masala is a finishing spice. Stir ½ to 1 teaspoon into your curry during the final 2 to 5 minutes of simmering, cover with a lid, and let the steam infuse the entire sauce.
10 Delicious Ways to Use Homemade Garam Masala
Once you have a fresh jar sitting in your pantry, don’t save it exclusively for weekend curry nights. Try using a pinch in these everyday dishes:
Classic Restaurant-Style Curries: Stir ¾ teaspoon into Butter Chicken (Murgh Makhani), Chicken Tikka Masala, Rogan Josh, or Lamb Keema right before serving.
Hearty Vegetarian & Vegan Mains: Elevate Chana Masala (chickpea curry), Tadka Dal, Saag Paneer, or Aloo Gobi with a final sprinkle of fresh masala.
Tandoori & Yogurt Marinades: Whisk 1 teaspoon into thick Greek yogurt with garlic, ginger, lemon juice, and Kashmiri chili powder for juicy grilled chicken skewers or roasted cauliflower steaks.
Crispy Roasted Vegetables & Potatoes: Toss cubed sweet potatoes, carrots, butternut squash, or cauliflower florets in olive oil, sea salt, and ½ teaspoon garam masala before roasting at 215°C (425°F).
Upgraded Scrambled Eggs & Masala Omelets: Add a tiny pinch alongside finely diced onions, cilantro, and green chilies for an unforgettable savory breakfast.
Creamy Autumn & Winter Soups: Swirl ½ teaspoon into roasted butternut squash soup, pumpkin soup, or spiced red lentil soup just before ladling into bowls.
Spiced Burgers & Meatballs: Knead ½ teaspoon into ground lamb, beef, or turkey patties with finely chopped cilantro and grated onion for juicy, aromatic burgers.
Fragrant Rice & Pilafs: Stir a pinch into steamed basmati rice with a knob of butter, toasted cashews, and golden raisins.
Savory Popcorn Topping: Drizzle warm melted butter or ghee over freshly popped popcorn and dust with flaky salt and ¼ teaspoon garam masala.
Warm Spiced Chai or Hot Chocolate: Believe it or not, a tiny pinch of freshly ground garam masala adds incredible warmth to a mug of dark hot chocolate or spiced apple cider.
Frequently Asked Questions (FAQ)
How long does homemade garam masala last?
When stored in an airtight glass jar in a cool, dark cupboard away from heat and moisture, homemade garam masala retains its peak aroma and potency for 3 to 4 months, and remains safe to use for up to 6 months. If you want to extend its shelf life even further, store extra portions in a sealed jar in the freezer for up to a year.
Can I make garam masala without a spice grinder?
Yes! If you don’t own an electric spice or coffee grinder, you can crush the cooled toasted spices using a heavy granite mortar and pestle. Working in small batches, use a firm circular grinding motion rather than pounding straight down so seeds don’t bounce out of the bowl. You can also place the spices inside a heavy-duty zip-top bag and crush them firmly with a heavy rolling pin or the flat side of a meat mallet.
Do I have to peel green cardamom pods before grinding?
No, you do not need to peel them. Toast and grind the entire green pod—both the fibrous outer shell and the tiny dark seeds inside. The green husks carry plenty of essential oils, and once ground finely (or passed through a fine-mesh strainer), they blend seamlessly into the powder.
Is garam masala spicy (hot)?
Traditional garam masala is warm and aromatic rather than fiery hot. While black peppercorns and cloves provide a gentle, pleasant warmth, there are no chili peppers in this classic recipe. If you love heat, simply serve your dishes with fresh green chilies, cayenne pepper, or Kashmiri red chili powder added separately during cooking.
Can I use pre-ground spices instead of whole spices?
While you can stir together pre-ground cumin, coriander, cardamom, cinnamon, and cloves in a pinch, the aroma will be noticeably milder than grinding freshly toasted whole spices. If you only have pre-ground spices on hand, lightly warm them in a dry skillet over very low heat for just 20 to 30 seconds until fragrant before using—just watch them closely, as powdered spices burn almost instantly.
Ready to Transform Your Home Cooking?
Once you experience the difference between flat, store-bought spice jars and freshly toasted, home-ground garam masala, you will never go back. Give this 15-minute recipe a try before your next curry night, watch our step-by-step video guide ([https://www.youtube.com/shorts/wBNBndl6AtY](https://www.youtube.com/shorts/wBNBndl6AtY)) for a quick visual reference, and let us know in the comments which dish you’re making first!
For more simple, restaurant-quality recipes and kitchen shortcuts, subscribe to HusbandCanCook on YouTube and follow @husbandcancookofficial for daily cooking inspiration.
how to toast whole spices, authentic garam masala blend, how to make garam masala from scratch, best spices for aromatic curry, dry roasting spices for curry,why do you toast spices before grinding, difference between garam masala and curry powder, how to store homemade spice blends, best spice grinder for whole Indian spices

